We’ve all been there—those baking days when it feels like the sun is working against you. Covering a cake in the middle of a heatwave might sound like a recipe for disaster, but I promise you—it can be done, and done well!
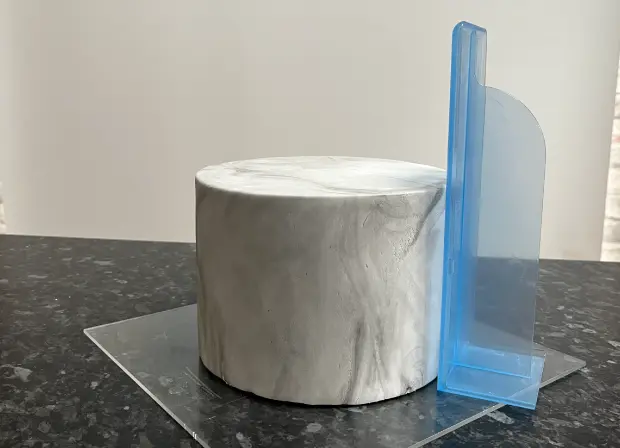
This summer, I tackled just that: a full fondant cover on what turned out to be the hottest day of the year. Now, I won’t pretend it was easy, but with a bit of planning, the right cake tools, and a dash of experience, I managed a flawless finish and sharp edges, all while avoiding the dreaded fondant drama.
I’ve shared a full breakdown of techniques, tools, common mistakes, and videos in my hub on how to get sharp edges on cakes.
So, how did I do it?
I began before the sun had a chance to hit full strength. Working in the coolest part of the day gave me the best chance of getting the job done before the heat really kicked in.
This one’s often overlooked but makes a huge difference: I kept all the curtains and blinds closed. Direct sunlight can quickly heat up your workspace—even if the room starts off cool. Blocking out the sun helps maintain a steady temperature and gives your fondant the best chance to behave.
This step is crucial. I made sure the cake was nicely chilled before applying fondant. It gave me more control and helped prevent any bulging or sagging.
Enter: my Sharp Edge Smoother®. Honestly, I never cover a cake without it, but it really proved its worth that day. It glides like a dream—especially when used with the right kind of fondant (more on that below!).
My dehumidifier was working overtime to keep the room just right. Reducing humidity is a game-changer when you’re working with sugarpaste in the heat. No more sticky or sweating fondant.
I used Saracino Pasta Top and Pasta Cover—and I can’t recommend them enough. No tearing, no sweating, no elephant skin… just smooth, pliable fondant that behaved beautifully, even in high temperatures. It worked perfectly with the Sharp Edge Smoother to give me crisp edges and a clean finish in minutes.
The Result?
A cake that looked like it had been covered in an air-conditioned studio—not a sweaty British kitchen on a scorcher of a day!
✨ Here’s a video of me doing it, so you can see exactly how I managed it step by step:
It just goes to show—when the conditions aren’t ideal, it’s not about working harder. It’s about working smarter. Preparation, the right tools, and professional-grade materials can make all the difference.
Have you ever tried covering a cake in extreme heat? Let me know how it went—or tag me in your posts. I’d love to see how you handle the heat!
– Carol x
Award winning cakes


⏰ Doors Close In:

Get VIP access to Carol’s Wedding Cake Lounge! Join for 12 months and enjoy expert guidance, tutorials, and a creative cake community.
Whether you’re looking to refine your skills or grow your cake business, the Wedding Cake Lounge is your key to success!
Join the waiting list now and be the first to know when the doors open!
Don’t miss your chance to grow your cake skills and business—secure your spot on the waiting list now!

Master show-stopping wedding cakes in Carol's online lounge - don’t miss out!
Learn how to make amazing wedding cakes from award-winning Carol in the exclusive lounge