A Beginner Friendly Guide
Creating sharp edges on fondant cakes is one of the most requested skills in cake decorating. Those crisp, clean edges instantly make a cake look professional and polished, yet many beginners believe sharp edges are difficult or only possible with years of experience.
The truth is, sharp edges are all about method, order, and gentle control, not force. Once you understand the process, sharp edges become repeatable and achievable, even on your very first attempt.
This beginner friendly guide walks you through how to get sharp edges on fondant cakes step by step, using a proven technique trusted by thousands of cake makers.
If you are new to the style, you may also find it helpful to explore the full guide on sharp edge cakes and professional fondant finishes, which explains the technique in more depth.
What You Need Before You Start
Before applying fondant, make sure your cake is well prepared.
You will need:
- A level cake with straight sides
- A smooth buttercream or ganache finish
- Fondant rolled evenly
- A sharp knife or blade
Many decorators find that using a sharp edge cake smoother makes it far easier to achieve straight sides and a clean top edge, especially when learning.
Step 1: Cover Your Cake with Fondant

Drape the fondant over your cake and gently attach it to the top and sides.
- Start at the top and work your way down
- Do not stretch or pull the fondant tightly
- Focus on neat attachment rather than perfection
At this stage, the fondant should be smooth but relaxed.
Step 2: Gently Lift the Fondant to Remove Creases

As you smooth down the sides, gently lift the fondant away from the cake as you go.
This lifting motion:
- Releases trapped air
- Prevents pleats and creases
- Helps the fondant fall naturally against the cake
This step is essential for smooth sides and clean edges later.
Step 3: Trim the Excess Fondant
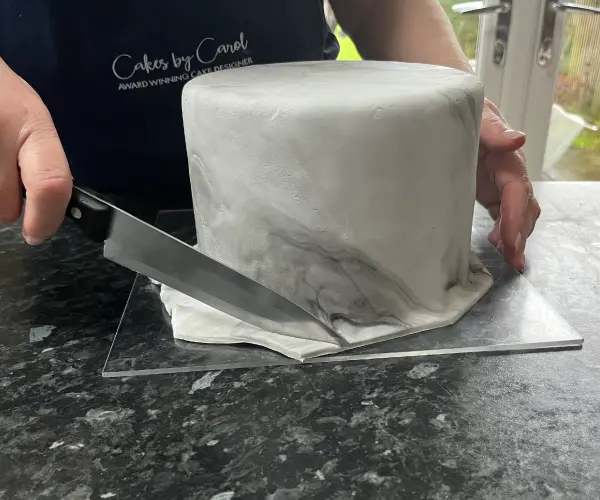
Trim away the excess fondant, leaving around 10mm at the base.
Leaving this small amount of excess makes it easier to position the paste and won’t drop down once you flip the cake over.
Step 4: Flip the Cake Using an Acrylic Plate

Place an acrylic plate on top of the cake and carefully flip the cake upside down.
This technique:
- Allows gravity to assist with straight sides
- Helps create a cleaner, sharper top edge
- Improves overall control
If you do not already own acrylic plates, they are a useful addition when learning professional sharp edge cake techniques.
Step 5: Smooth the Sides Using a Sharp Edge Smoother

Holding the sharp edge smoother at the bottom of the cake, gently push it forward and pull it back.
- Keep the smoother flat and vertical, in contact with the plate and cake at all times.
- Use light, even pressure
- Concentrate on the bottom edge first
This action smoothes the sides without forcing the fondant.
Step 6: Trim Away Any Remaining Excess Paste
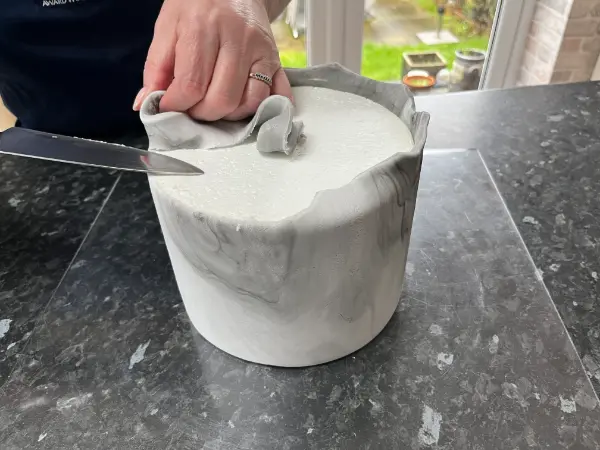
Carefully flip the cake back the right way up.
Using the sharp edge smoother, refine the sides again and gently work towards the top edge to create a clean, crisp finish where the sides meet the top.
This is where sharp edges really start to appear.
Step 7: Flip the Cake Back and Finish Off
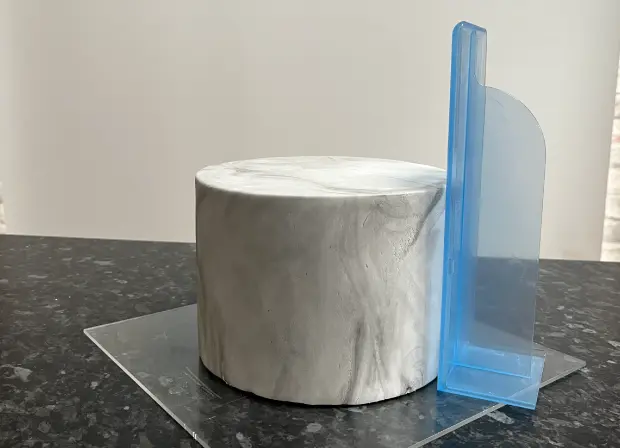
Once you have a sharp edge at the bottom, carefully flip the cake back the right way.
Using the Sharp edge Smoother round the side to finish off if required.
Why This Method Works for Beginners
This method works because it:
- Uses gravity to your advantage
- Avoids stretching or overworking the fondant
- Builds sharp edges gradually, not aggressively
Many beginners struggle with sharp edges because they are taught to press too hard or rush the process. With the right sequence and a tool designed specifically for sharp edge fondant cakes, results improve dramatically.
Do You Need Special Tools to Get Sharp Edges?
While sharp edges can be attempted with basic smoothers, many cake makers find it far easier to achieve consistent results using:
- A sharp edge cake smoother designed for straight sides
- Acrylic plates for flipping and control
These tools remove much of the guesswork and help beginners achieve professional looking finishes more quickly.

Want to Learn More About Sharp Edge Cakes?
This guide gives you the foundation, but sharp edges become truly consistent once you understand the full method and technique.
You may find it helpful to explore:
- A complete guide to how to create sharp edge cakes with smooth fondant finishes
- Free video tutorials showing the technique in action
- In depth training for decorators wanting professional results
Sharp edges are not about perfection on the first try. They are about learning a method that works and practising it with confidence.
Carol x