Can You Help Us Win?We’re finalists for THREE Cake & Bake International Awards! Two are decided by public vote, and it takes less than a minute to support us.
Can You Help Us Win?We’re finalists for THREE Cake & Bake International Awards! Two are decided by public vote, and it takes less than a minute to support us.
If you’ve ever covered a cake and felt frustrated because you just can’t get rid of the lumps and bumps, you’re not alone. Maybe the sides won’t smooth properly, fingerprints keep appearing, or the top edge never quite looks crisp and professional no matter how careful you are.
Sharp edges are one of the most sought-after finishes in cake decorating, but they’re also one of the hardest to achieve consistently. I hear from cake makers all the time who say they’ve tried different techniques, spent ages smoothing, and still can’t get that clean, polished look they’re aiming for.
The important thing to know is this. Struggling with sharp edges doesn’t mean you lack skill. It usually means one or more key parts of the process aren’t quite right.
What is a sharp edge cake?
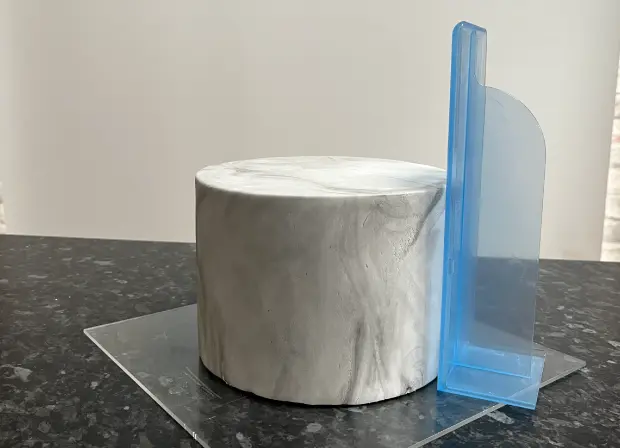
A sharp edge cake has perfectly smooth fondant sides and a clean, defined top edge where the sides meet the top at a clear 90 degree angle. There’s no rounding over, no bulging, and no visible imperfections.
This style of finish instantly gives cakes a professional, contemporary look and is why sharp edges are so popular for wedding cakes, celebration cakes, birthday cakes, baby shower cakes and competition work.
Why sharp edges often go wrong
Most sharp edge problems come down to three things: structure, support, and using the right tools.
If the cake underneath isn’t firm, the fondant moves as you smooth it. If the top edge isn’t supported, gravity pulls the paste downwards. And if the tools you’re using aren’t designed for creating sharp edges, you end up chasing imperfections rather than refining the finish.
Overworking the fondant can make things worse too. The more you smooth, the warmer and irritated it becomes, which leads to drag marks, elephant skin, and uneven surfaces.
Over the years, I’ve learned that sharp edges aren’t about one clever trick. They’re about following a method that supports the fondant at every stage and using cake tools that work with the technique, not against it.
That’s why I’ve pulled everything I teach into one place, including preparation, covering, tools, and common mistakes.
Before fondant even comes into the picture, your cake needs a solid foundation.
Your ganache or buttercream should be smooth, level, and finished with a clean top edge, then chilled until firm. Covering a soft cake is like trying to smooth icing on a sponge. There’s too much movement and no resistance.
Once the cake is firm, you’re giving yourself the structure needed to achieve crisp, clean edges.
Fondant thickness and control
Rolling your fondant slightly thicker than usual gives you far more control when creating sharp edges.
Fondant that’s too thin stretches easily, shows every imperfection underneath, and doesn’t have enough movement to form a clean edge. Thicker paste allows you to guide it into place without tearing or dragging.
Why the upside down method works
One of the biggest breakthroughs for creating sharp edges is flipping the cake upside down during the smoothing stage.
Using acrylic plates to flip the cake supports the fondant while you work, rather than letting it drop away from the top edge. This simple change gives you much more control and helps the fondant form a defined 90 degree edge naturally.
This is where the Sharp Edge Smoother fits into the process. It’s designed specifically for creating sharp edges while smoothing the sides at the same time. Used with the upside down method, it stays in contact with both the cake and the plate, gently pushing the fondant into that top edge rather than pulling it away.
If you don’t already use acrylic plates, they make flipping, smoothing, and refining the finish far easier and more consistent, especially when working on taller cakes.
Once the method and tools are working together, many cake makers notice the same thing. Sharp edges stop feeling like hard work.
Here’s what some have said after using the Sharp Edge Smoother as part of the process:
“Great tool for those perfect sharp edges.” Keith
“It’s completely transformed my fondant icing skills.” Alison
“I’m so pleased with the sharp edge smoother and would highly recommend it.” Sharon
“I can’t believe how much easier it is to get that all smooth finish.” Josephine
“Really makes my cakes look so sharp.” Corinne Fox
Sharp edges are about confidence, not perfection
Sharp edges shouldn’t feel exhausting or stressful.
When you understand the structure your cake needs, follow a clear method, and use tools designed specifically for sharp edges, the finish becomes calmer, quicker, and far more consistent.
If getting sharp edges has been a sticking point for you, start with the Sharp Edge Cakes hub. It walks you through the full process step by step and explains why each stage matters, so you can build confidence and achieve professional results without the frustration.
Sometimes it’s not about working harder. It’s about working smarter, using the right method and the right tools together.
To provide the best experiences, we use technologies like cookies to store and/or access device information. Consenting to these technologies will allow us to process data such as browsing behaviour or unique IDs on this site. Not consenting or withdrawing consent, may adversely affect certain features and functions.
Functional
Always active
The technical storage or access is strictly necessary for the legitimate purpose of enabling the use of a specific service explicitly requested by the subscriber or user, or for the sole purpose of carrying out the transmission of a communication over an electronic communications network.
Preferences
The technical storage or access is necessary for the legitimate purpose of storing preferences that are not requested by the subscriber or user.
Statistics
The technical storage or access that is used exclusively for statistical purposes.The technical storage or access that is used exclusively for anonymous statistical purposes. Without a subpoena, voluntary compliance on the part of your Internet Service Provider, or additional records from a third party, information stored or retrieved for this purpose alone cannot usually be used to identify you.
Marketing
The technical storage or access is required to create user profiles to send advertising, or to track the user on a website or across several websites for similar marketing purposes.